Moonridden:starter guide sandbox
Lorem
Lorem
Lorem
Preamble
This guide is designed for amateur players, those new to TG Code, and those wishing to lube their entry to the community.
We're focusing on getting people adjusted to the server's UI design and assisting with its navigation.
Before Playing
This guide assumes you have completed the steps listed in How Do I get into Nova Sector? and already know how to open the client and connect, as that was part of your application.
Getting Around the Client UI

The Client
Also known as the application window, this encompasses everything you see when you launch our server with BYOND.
Once you've connected to a server, you'll be greeted by
- the Top Bar, in the top left corner
- the Game Window on the left taking up most of the screen,
- the Side Bar is made up of the panels on the side of the screen, which are:
- the Verb Panel in the top right, with all its tabs and glory
- the Chat Box on the mid to bottom right,
- and the Command Line in the very bottom right hand corner.
Sizing of the window panels can be performed by clicking and dragging the dividers.
Let's get familiarized.

Top Bar
Along the top of the game window, you will see some tabs.
These control the client itself, and give you quick access to the two primary client configuration and setup windows.
Game Preferences can only be accessed here, with the 'Open-Game-Preferences' verb used in the Command Line, or by clicking the OOC > 'Open Game Preferences' verb.
| Menu Tab Option | Description of Option |
|---|---|
| Quick screenshot | Take a quick screenshot with F2, which is stored in your C:\Users\(User)\Documents\BYOND\screenshots folder. |
| Save screenshot as | Similar to above, but you get a popup to choose where. |
| Reconnect | Attempts to refresh the connection to the server. Useful if your client is stuttering or misbehaving in any way. |
| Quit | Disconnects from the server and closes the |
| Menu Tab Option | Description of Option |
|---|---|
| Open Character Preferences | Opens the Character Preferences Panel |
| Open Game Preferences | Opens the Game Preferences Panel |
| Menu Tab Option | Description of Option |
|---|---|
| Admin Help | Opens up an Admin Help, can also be accessed with the F1 hotkey. |
| Hotkeys | Takes you to the Hotkeys Help window, which builds from your customized hotkeys. |
Stat Panel
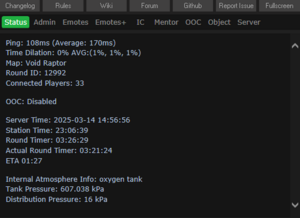
Used to describe the entire section above the Chat Box.
Quick Links
Above the Verb Panel, you've got the Quick Links area.
Opens the Changelog verb, showing off all recent adjustments to Nova's code with comments
Takes you to the Policies page
Opens the Wiki
Opens the... TG Station Forums. Don't ask me why, we probably need to fix that.
Opens our Github
Opens a prompt to take you to the Github Issue Tracker submission page.
Fullscreens the Client.
Verb Panel
Under the Quick Links area, you have the main Verb Panel.
A Verb is a command sent to the Server by your Game Client. Clicking a verb in this panel does the same thing as running that Verb in the Command Line.
The Verb Panel provides rapid access to different utilities, actions and interactions, panels, settings, and more.
People who click verbs or emotes that could be made into hotkeys are known as 'Verb Clickers'. Yes, that is a bit derogatory. Play the game how you prefer, I suppose.
This is the heart of interacting with the game client, and there is much to look at.
We will provide a basic overview of each section. Most verbs are self explanatory.
This page shows information such as Ping, Time Dilation (also called TDI, which describes Server Load), the current Map, the Round ID, how many players are currently connected, information on the Server / Station / Round Timers (Actual Round Timer starts when the shift starts, Round Timer counts the entire duration of the server uptime for the current shift). This will also show relevant status about your character state, such as the charge of your modsuit or how much air is left in your connected air tank.
For interacting with the staff. Administrators see SIGNIFICANTLY MORE here.
Useful Verbs:
- Adminhelp - Reach out to the staff with a question. If it's not staff relevant, it may be kicked down to a Mentor Help
- View Recent Ticket - Shows a window with your recent ticket interactions.
A long list of simple emotes that do not change the character state, make a sound, or make an animation.
A long list of advanced emotes that create sound, play an animation or change the character state, and more.
Things relevant to controlling your character go here.
Useful Verbs:
- Shift Layer Upwards / Downwards - Controls what you appear above and below. Other players have different layers that you'll need to work with.
- Navigate - A verb mirror for the UI Navigate button. Helps you get around station Z-Levels.
- Emote Panel - Opens a nice little UI to see all the different emotes and their types
- Feign Impairment - Act drunk without being drunk
- Pray - Send an IC or OOC message to the admins requesting help, items, or any conversation that does not warrant an AHelp.
Interact with Mentor related verbs here. Useful Verbs:
- Mentor Help - Ask any online Mentors for gameplay, not policy or rules, related help.
Things to do with not IC related actions show up here.
Useful Verbs:
- Character Directory - Shows advertisements for other player characters currently online
- Request Internet Sound - Send a link to a song on Soundcloud or Bandcamp to staff online that may or may not be played
- OOC - Speak in OOC chat when it's available to be used
- View Admin Remarks - Shows your notes and ban history, if you have any
- View Tracked Playtime - Shows your server playtime, with breakdowns for each role.
Verb based interactions with held or nearby objects
Useful Verbs:
- Pick up - Opens a window to select, from a list, from all 1 tile nearby items to pickup
- Pull - Opens a window to select, from a list, from all 1 tile nearby items to pull
- Adjust Suit Sensors - Verb to quickly access the Suit Sensors on your Suit item. Use Tracking Beacon unless you know better
Interact with Game Server related verbs
Verbs to change how your Ghost / Observe mode functions show up here
Useful Verbs:
- Restore Ghost Character - Updates your current ghost model to your currently selected character if you have changed it
- T-Ray Scan - Does a momentary screenwide pipe and cable view. Not persistent due to lag.
- Toggle Chem Scan - Scan containers for contents
- Toggle Ghost Vision - Shows or hides other ghosts
- Toggle Darkness - Swap between lighting modes for Observer
- Toggle Health Scan - Inspecting people with this enabled will show a health analyzer left click scan above their inspect information. You may need to scroll up to see this after it outputs to the chat log
- Toggle Sec/Med/Diag Hud - Turns ghost view huds on and off, because it looks nicer sometimes
- View Range - Select how far you can see as a ghost, not changeable while PLAYING the game, only Observing
Commands that show up while inhabiting the AI or Cyborg bodies See the AI or Cyborg pages for information on special verbs available to them.
Shows verbs to interact with any spells you might have, for whatever reason
Take a look at the Verbs page whenever that gets made for a full list explanation of what each verb does.
Chat Box
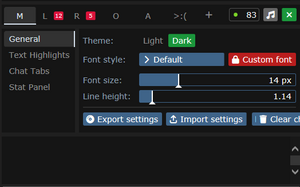
This is where all game messages, radio, adminhelps, and essentially everything contextual about the game will appear. It's highly configurable, just hit the little Cogwheel icon. This is how you change between Light Mode and Dark Mode.
This normally empty space is where the Main tab, and any custom Chat Tabs, are found. Clicking the Plus will create a new Chat Tab, while also opening up the Chat Box Settings > Chat Tabs section. More on that later.
The time, in milliseconds, to get a response from the server.
Found after the ping box, it's the Music Note. Opens or hides the Admin Music Control box. You'll find a dial on that window, where you can control the volume of the music that will play.
Found on the top right corner of the chat box of the. Can be in a Gear or Cross state, depending on if the panel is Closed or Open respectively. We cover what is inside the settings tab below.
Side Bar and Chat Settings
Opened with the Setting Button, seen above.
Provides control over the Side Bar.
Most people can make do without changing a thing, but it is there if you want to mess with it.
- Theme - Choose between Light and Dark Modes. There is only one correct choice.
- Font Style - Lets you pick a different font. There are a variety of preselected fonts. The Default font will change to different fonts contextually with gameplay. A Custom Font button can also be found here, if you want to upload your own.
- Font Size - Change the font size of the chat window.
- Line Height - Adjusts spacing between lines in the chat box
- Export Settings - Export a copy of your chat settings. DO THIS AFTER FINISHING SETUP.
- Import Settings - Imports a saved copy of your chat settings
- Save chat log - Saves the chat log. WILL ONLY SAVE THINGS CURRENTLY IN CACHE.
- Clear Chat - Clears the chat log and cache.
A complex panel. Here, you've got a list of possible highlight filters that you can create on your own. This does accept regex, but I do not suggest using it for performance reasons.
- Whole Message - Highlights the entire line separately of the color of the highlighted word
- Exact - Matches identical spellings, does not look within words
- Case - Makes the contained filter terms case sensitive
- Color Entry Field - Allows you to select the hex RGB code used in the highlight
At the bottom of the page you will find the APPLY NOW button. Make SURE to hit that when you are done.
This is how you narrow the scope of what's presented to you during gameplay. Each tab can be configured it's own way.
Controls the Stat Panel design. Encompasses the Verb Panel.
- Default and Classic - Quite similar, but the differences are important to some people
- Scrollable - Makes the tabs only show in a row and gives you a scrollbar. If you're into that.
- Font Size - Adjusts size of font in the Verb Panel
- Link to Chat - Links these settings together with the chat panel. Your mileage my vary.
Command Line

Here you can enter verbs manually, with autofill support. Useful if you know what you're doing.
This is the box you type Verbs into. Verbs are hyphenated if they contain multiple words.
Loads the Say verb. Will speak In Character. Using the chat hot key for this is better, as it doesn't require cursor focus on the command line.
Loads the Me verb, which is how custom emotes are performed. Using the chat hot key for this is better, as it doesn't require cursor focus on the command line.
Loads the OOC verb, which speaks in global Out of Character Chat. This is only usually enabled at the beginning and end of the round. Using the chat hot key for this is better, as it doesn't require cursor focus on the command line.
Configuring Your Client
Now that we can get around, it's time to make the client YOURS.
Getting familiar with what can be tuned and controlled will improve your gameplay experience down the road.
Game Preferences
Under the Top Bar > Preferences > Game Preferences option we can begin setting things up for gameplay.
This is not required, but it is encouraged for player Quality of Life.
Settings
This area controls the primary behavior of the client, and enables or disables features.
| Menu Tab Option | Description of Option |
|---|---|
| Quick screenshot | Take a quick screenshot with F2, which is stored in your C:\Users\(User)\Documents\BYOND\screenshots folder. |
| Save screenshot as | Similar to above, but you get a popup to choose where. |
| Reconnect | Attempts to refresh the connection to the server. Useful if your client is stuttering or misbehaving in any way. |
| Quit | Disconnects from the server and closes the |
| Menu Tab Option | Description of Option |
|---|---|
| Open Character Preferences | Opens the Character Preferences Panel |
| Open Game Preferences | Opens the Game Preferences Panel |
| Menu Tab Option | Description of Option |
|---|---|
| Admin Help | Opens up an Admin Help, can also be accessed with the F1 hotkey. |
| Hotkeys | Takes you to the Hotkeys Help window, which builds from your customized hotkeys. |
Keybindings
This is where you can change how hotkeys work. There is a ridiculous level of control here.
There is a row of navigational buttons to take you to each major section of the page quickly
| Menu Tab Option | Description of Option |
|---|---|
| Quick screenshot | Take a quick screenshot with F2, which is stored in your C:\Users\(User)\Documents\BYOND\screenshots folder. |
| Save screenshot as | Similar to above, but you get a popup to choose where. |
| Reconnect | Attempts to refresh the connection to the server. Useful if your client is stuttering or misbehaving in any way. |
| Quit | Disconnects from the server and closes the |
| Menu Tab Option | Description of Option |
|---|---|
| Open Character Preferences | Opens the Character Preferences Panel |
| Open Game Preferences | Opens the Game Preferences Panel |
| Menu Tab Option | Description of Option |
|---|---|
| Admin Help | Opens up an Admin Help, can also be accessed with the F1 hotkey. |
| Hotkeys | Takes you to the Hotkeys Help window, which builds from your customized hotkeys. |
Preparing Your Character
Special names are names specific to certain roles - for example, if you're the clown, you may want a funny name instead of your regular one. The name policy is relaxed on these, so if you have a funny idea for a name, go nuts (within reason - this is at admin discretion). The only custom job preference is specific to security officers, and allows you to choose the department you'd like to monitor. The Uplink spawn location is specific to the traitor role, and determines the item you can access your uplink from, where you can purchase different tools to accomplish your goals. The various species options have some effects on gameplay - you can browse the articles for lizards, flypeople, and plasmamen for more info.
Next, press the Set Occupation Preferences button.
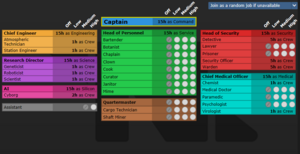
If the button next to Assistant is a red NO, click it once so that it says YES in green text. This sets your job to be assistant, no matter what.
When the game begins, the server checks each players occupation preferences, and assigns jobs accordingly. You can pick High, Medium, Low, or Never. Each player is limited to one High preference job. Some roles have limited player counts - for example, there is only one Captain. There is no limit on assistants, and it's a role that has no responsibilities, so it's ideal for getting to grips with the game. Some jobs that are critical to game progression are locked off until a certain amount of time has passed since your first login. Check the job selection and assignment page for more info.
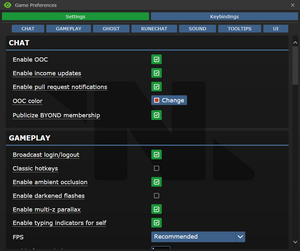
After that, press Done, then, Save Setup. Then click on Game Preferences at the top of the character creation screen. The menu will change and have a big list of options.
Make sure all of the Special Role Settings are set to No (These control optional settings, like choosing if you'd like to roll for a traitor role - they assume you know how to play the game and are important to the round, so we want them off for now.) More importantly, change the Keybindings option to "Hotkeys". This guide will assume you're using this control scheme, as it provides quicker functions for actions than the default controls. Most of the options here are relatively self explanatory or irrelevant, so once you're done, click Save Setup one last time and close the window. Template:Clear
Joining the Station
 |
C-05-MO, the AI says: "Hello! The automatic diagnostic and announcement system welcomes you to Space Station 13. Remember: Have a secure day." |
Now that you've created your character, you're ready to join the game. (You may want to continue to read the guide before jumping in.)
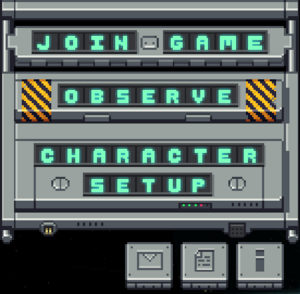
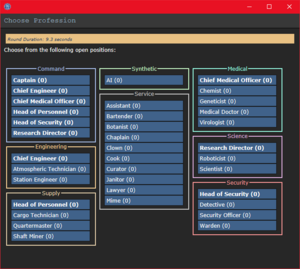
There's two possible menus here - the lobby screen will either display a list that has Join Game! or a Ready/Not Ready toggle.
</tab>
If the window has three buttons that say Ready, Not Ready, and Observe, that means a round has not started yet.
This is ideal, because you'll be playing the round from the beginning, when things are the going to be calm and allow you to get your bearings in a relatively safe environment. Toggle the button to Ready, then wait for the game to begin. (You can see the time until the game begins on the Lobby tab, on the top right of the game window.)
Pressing Observe will spawn you as a ghost, which is essentially a spectator - you won't be able to spawn normally until the next round if you select this option!
Gameplay Interface 101
HUD
Health
The health ![]() icon and
icon and ![]() doll change depending on how injured you are.
doll change depending on how injured you are.
Hands
![]() One of the most important elements of the HUD. You have the ability to hold an item in each hand (unless an item takes up both hands, obviously). The square around one of the hands is the selected hand. If you have an empty selected hand, and click on an object, you'll pick it up/open it/use it. If an object is in your selected hand and you click on something, you'll use it on the item you're holding. (The way this works means that if you'd like to unequip your backpack, you need to click and drag the bag into your hand - if it was removed by clicking on it, you'd never be able to open the bag.)
One of the most important elements of the HUD. You have the ability to hold an item in each hand (unless an item takes up both hands, obviously). The square around one of the hands is the selected hand. If you have an empty selected hand, and click on an object, you'll pick it up/open it/use it. If an object is in your selected hand and you click on something, you'll use it on the item you're holding. (The way this works means that if you'd like to unequip your backpack, you need to click and drag the bag into your hand - if it was removed by clicking on it, you'd never be able to open the bag.)
If this seems confusing, don't worry - it'll be explained shortly.
Inventory
The backpack ![]() icon can be toggled to show your worn equipment.
icon can be toggled to show your worn equipment.
The belt ![]() , backpack
, backpack ![]() , and pocket
, and pocket ![]() icons are all storage locations.
icons are all storage locations.
The ID ![]() slot can hold your ID, or your PDA (which can hold your ID).
slot can hold your ID, or your PDA (which can hold your ID).
Interactions
These buttons directly affect how you interact with objects.
The drop ![]() and throw
and throw ![]() icons do what the name implies. Dropping is self explanatory, but the throw button is a toggle - if it's on and you click somewhere, you'll throw the item in your hand at where you clicked. (You can also press R to enable throwing and Q to drop your held item.)
icons do what the name implies. Dropping is self explanatory, but the throw button is a toggle - if it's on and you click somewhere, you'll throw the item in your hand at where you clicked. (You can also press R to enable throwing and Q to drop your held item.)
The pull ![]() icon only appears when dragging something, and can be pressed to stop dragging an object. Hotkey: "H".
icon only appears when dragging something, and can be pressed to stop dragging an object. Hotkey: "H".
The internals ![]() icon can be clicked to enable/disable your internals (oxygen tank and breath mask).
icon can be clicked to enable/disable your internals (oxygen tank and breath mask).
The resist ![]() icon can be pressed to break out of grabs, restraints, and if you're on fire, is the "stop drop and roll" button. Hotkey: "B".
icon can be pressed to break out of grabs, restraints, and if you're on fire, is the "stop drop and roll" button. Hotkey: "B".
The run/walk toggle ![]() icon can be pressed to switch between running and walking. Running is faster, but walking has benefits, such as being able to walk over water without slipping - useful for when the janitor doesn't put wet floor signs down. Hotkey: Hold "alt" to walk.
icon can be pressed to switch between running and walking. Running is faster, but walking has benefits, such as being able to walk over water without slipping - useful for when the janitor doesn't put wet floor signs down. Hotkey: Hold "alt" to walk.
The body selector ![]() icon is used to choose which body part you want to target. This is used for both targeting specific sections to heal, or targeting specific sections when attacking someone. Click a limb to target it. (You can target individual arms, legs, the head, the upper torso, the groin, the eyes, or the mouth.) Hotkeys: "numpad keys".
icon is used to choose which body part you want to target. This is used for both targeting specific sections to heal, or targeting specific sections when attacking someone. Click a limb to target it. (You can target individual arms, legs, the head, the upper torso, the groin, the eyes, or the mouth.) Hotkeys: "numpad keys".
Combat Indicator File:Combat.png this indicator turns on 'combat mode', which displays an icon above your sprite indicating you are prepared for combat. Doing this is required before you engage in any fighting, both mechanically and rules wise, as it raises your defense against people that aren't in it substantially, as well as massively boosting your weapon accuracy and melee damage for all sources. Hotkeys: "C".
Last but not least is the intent selector ![]() - this will be explained in detail later. It has four modes: Help, Disarm, Grab, and Harm, in clockwise order. Hotkeys: "1-4".
- this will be explained in detail later. It has four modes: Help, Disarm, Grab, and Harm, in clockwise order. Hotkeys: "1-4".
Misc Icons
The crafting menu ![]() icon opens the crafting menu.
icon opens the crafting menu.
The speech bubble ![]() icon opens the languages menu. You won't need to use this for the tutorial.
icon opens the languages menu. You won't need to use this for the tutorial.
The create area ![]() icon is used to create an "area", which is a more advanced topic. You won't need to worry about it for this tutorial.
icon is used to create an "area", which is a more advanced topic. You won't need to worry about it for this tutorial.
Alerts
![]() Oxygen warning - The air you're breathing doesn't have enough oxygen.
Oxygen warning - The air you're breathing doesn't have enough oxygen.
![]() Pressure warning - Pressure levels are too high (red) or too low (black). Low and high pressures can kill you.
Pressure warning - Pressure levels are too high (red) or too low (black). Low and high pressures can kill you.
![]() Toxin warning - You are breathing in toxic gases.
Toxin warning - You are breathing in toxic gases.
![]() Fire warning - The air is hot enough to burn you.
Fire warning - The air is hot enough to burn you.
![]() Freeze warning - The air is cold enough to freeze you.
Freeze warning - The air is cold enough to freeze you.
![]() Temperature warning - You're too cold or too hot.
Temperature warning - You're too cold or too hot.
![]() Hunger warning - You're starting to get hungry. You cannot die from hunger, but the longer you go without food, the slower you will be able to run. You can also eat too much and become bloated.
Hunger warning - You're starting to get hungry. You cannot die from hunger, but the longer you go without food, the slower you will be able to run. You can also eat too much and become bloated.
If you join a game in progress, you'll spawn on the Interlink..
