Moonridden:starter guide sandbox: Difference between revisions
Moonridden (talk | contribs) (hows this look?) |
Moonridden (talk | contribs) (maybe here) |
||
| Line 94: | Line 94: | ||
The Verb Panel provides rapid access to different utilities, actions and interactions, panels, settings, and more. | The Verb Panel provides rapid access to different utilities, actions and interactions, panels, settings, and more. | ||
People who click verbs or emotes that can be made into hotkeys are known as 'Verb Clickers'. Yes, that is a bit derogatory. Play the game how you prefer, I suppose. | People who click verbs or emotes that can be made into hotkeys are known as 'Verb Clickers'. Yes, that is a bit derogatory. Play the game how you prefer, I suppose.[[File:Verb Panel 2025.png|thumb|An image showing off the Verb Panel on the status tab while inhabiting a body and having an active oxygen tank. This panel will change contextually and offer new tabs and verbs.]]This is the heart of interacting with the game client, and there is much to look at. | ||
This is the heart of interacting with the game client, and there is much to look at. | |||
We will provide a basic overview of each section. Most verbs are self explanatory. | We will provide a basic overview of each section. Most verbs are self explanatory. | ||
| Line 127: | Line 125: | ||
===== Verb Panel ===== | ===== Verb Panel ===== | ||
Under the '''Quick Links''' area, you have the main '''Verb Panel'''. | Under the '''Quick Links''' area, you have the main '''Verb Panel'''.<tabs style="width:75%"> | ||
<tab name="Status"> | <tab name="Status"> | ||
This page shows information such as Ping, Time Dilation (also called TDI, which describes Server Load), the current Map, the Round ID, how many players are currently connected, information on the Server / Station / Round Timers (Actual Round Timer starts when the shift starts, Round Timer counts the entire duration of the server uptime for the current shift). This will also show relevant status about your character state, such as the charge of your modsuit or how much air is left in your connected air tank. | This page shows information such as Ping, Time Dilation (also called TDI, which describes Server Load), the current Map, the Round ID, how many players are currently connected, information on the Server / Station / Round Timers (Actual Round Timer starts when the shift starts, Round Timer counts the entire duration of the server uptime for the current shift). This will also show relevant status about your character state, such as the charge of your modsuit or how much air is left in your connected air tank. | ||
Revision as of 17:14, 14 March 2025
Lorem
Lorem
Lorem
Preamble
This guide is designed for amateur players, those new to TG Code, and those wishing to lube their entry to the community.
Before Playing
This guide assumes you have completed the steps listed in How Do I get into Nova Sector? and already know how to open the client and connect, as that was part of your application.
Getting Around the Client UI

The Client
Also known as the application window, this encompasses everything you see when you launch our server with BYOND.
Once you've connected to a server, you'll be greeted by
- the Top Bar, in the top left corner
- the Game Window on the left taking up most of the screen,
- the Verb Panel in the top right, with all its tabs and glory
- the Chat Box on the mid to bottom right,
- and the Command Line in the very bottom right hand corner.
Sizing of the window panels can be performed by clicking and dragging the dividers.
Let's get familiarized.
Top Bar

Along the top of the game window, you will see some tabs.
These control the client itself, and give you quick access to the two primary client configuration and setup windows.
Game Preferences can only be accessed here, with the 'Open-Game-Preferences' verb used in the Command Line, or by clicking the OOC > 'Open Game Preferences' verb.
| Menu Tab Option | Description of Option |
|---|---|
| Quick screenshot | Take a quick screenshot with F2, which is stored in your C:\Users\(User)\Documents\BYOND\screenshots folder. |
| Save screenshot as | Similar to above, but you get a popup to choose where. |
| Reconnect | Attempts to refresh the connection to the server. Useful if your client is stuttering or misbehaving in any way. |
| Quit | Disconnects from the server and closes the |
| Menu Tab Option | Description of Option |
|---|---|
| Open Character Preferences | Opens the Character Preferences Panel |
| Open Game Preferences | Opens the Game Preferences Panel |
| Menu Tab Option | Description of Option |
|---|---|
| Admin Help | Opens up an Admin Help, can also be accessed with the F1 hotkey. |
| Hotkeys | Takes you to the Hotkeys Help window, which builds from your customized hotkeys. |
Verb Panel
A Verb is a command sent to the Server by your Game Client. Clicking a verb in this panel does the same thing as running that Verb in the Command Line.
The Verb Panel provides rapid access to different utilities, actions and interactions, panels, settings, and more.
People who click verbs or emotes that can be made into hotkeys are known as 'Verb Clickers'. Yes, that is a bit derogatory. Play the game how you prefer, I suppose.
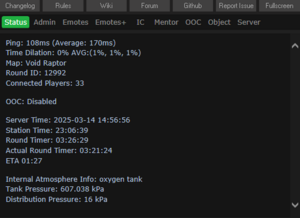
This is the heart of interacting with the game client, and there is much to look at.
We will provide a basic overview of each section. Most verbs are self explanatory.
Quick Links
Above the Verb Panel, you've got the Quick Links area.
Opens the Changelog verb, showing off all recent adjustments to Nova's code with comments
Takes you to the Policies page
Opens the Wiki
Opens the... TG Station Forums. Don't ask me why, we probably need to fix that.
Opens our Github
Opens a prompt to take you to the Github Issue Tracker submission page.
Fullscreens the Client.
Verb Panel
Under the Quick Links area, you have the main Verb Panel.
This page shows information such as Ping, Time Dilation (also called TDI, which describes Server Load), the current Map, the Round ID, how many players are currently connected, information on the Server / Station / Round Timers (Actual Round Timer starts when the shift starts, Round Timer counts the entire duration of the server uptime for the current shift). This will also show relevant status about your character state, such as the charge of your modsuit or how much air is left in your connected air tank.
For interacting with the staff. Administrators see SIGNIFICANTLY MORE here.
Useful Verbs: > Adminhelp - Reach out to the staff with a question. If it's not staff relevant, it may be kicked down to a Mentor Help > View Recent Ticket - Shows a window with your recent ticket interactions.
A long list of simple emotes that do not change the character state, make a sound, or make an animation.
A long list of advanced emotes that create sound, play an animation or change the character state, and more.
Things relevant to controlling your character go here.
Useful Verbs: > Shift Layer Upwards / Downwards - Controls what you appear above and below. Other players have different layers that you'll need to work with. > Navigate - A verb mirror for the UI Navigate button. Helps you get around station Z-Levels. > Emote Panel - Opens a nice little UI to see all the different emotes and their types > Feign Impairment - Act drunk without being drunk > Pray - Send an IC or OOC message to the admins requesting help, items, or any conversation that does not warrant an AHelp.
Interact with Mentor related verbs here. Useful Verbs: > Mentor Help - Ask any online Mentors for gameplay, not policy or rules, related help.
Things to do with not IC related actions show up here.
Useful Verbs: > Character Directory - Shows advertisements for other player characters currently online > Request Internet Sound - Send a link to a song on Soundcloud or Bandcamp to staff online that may or may not be played > OOC - Speak in OOC chat when it's available to be used > View Admin Remarks - Shows your notes and ban history, if you have any > View Tracked Playtime - Shows your server playtime, with breakdowns for each role.
Verb based interactions with held or nearby objects
Useful Verbs: > Pick up - Opens a window to select, from a list, from all 1 tile nearby items to pickup > Pull - Opens a window to select, from a list, from all 1 tile nearby items to pull > Adjust Suit Sensors - Verb to quickly access the Suit Sensors on your Suit item. Use Tracking Beacon unless you know better
Interact with Game Server related verbs
Verbs to change how your Ghost / Observe mode functions show up here
Useful Verbs: > Restore Ghost Character - Updates your current ghost model to your currently selected character if you have changed it Useful Verbs: > T-Ray Scan - Does a momentary screenwide pipe and cable view. Not persistent due to lag. > Toggle Chem Scan - Scan containers for contents > Toggle Ghost Vision - Shows or hides other ghosts > Toggle Darkness - Swap between lighting modes for Observer > Toggle Health Scan - Inspecting people with this enabled will show a health analyzer left click scan above their inspect information. You may need to scroll up to see this after it outputs to the chat log > Toggle Sec/Med/Diag Hud - Turns ghost view huds on and off, because it looks nicer sometimes > View Range - Select how far you can see as a ghost, not changeable while PLAYING the game, only Observing
Commands that show up while inhabiting the AI or Cyborg bodies See the AI or Cyborg pages for information on special verbs available to them.
Shows verbs to interact with any spells you might have, for whatever reason
Take a look at the Verbs page whenever that gets made for a full list explanation of what each verb does.
Chat Box
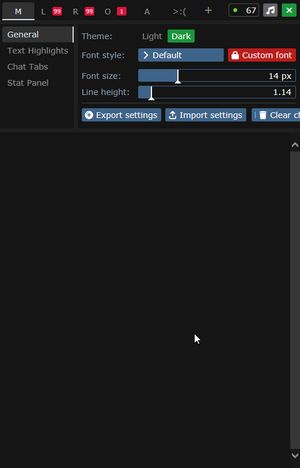
This is where all game messages, radio, adminhelps, and essentially everything contextual about the game will appear.
It's highly configurable, just hit the little Cogwheel icon. This is how you change between Light Mode and Dark Mode.
Most people can make do without changing a thing, but it's there if you want to mess with it.
| Menu Tab Option | Description of Option |
|---|---|
| Quick screenshot | Take a quick screenshot with F2, which is stored in your C:\Users\(User)\Documents\BYOND\screenshots folder. |
| Save screenshot as | Similar to above, but you get a popup to choose where. |
| Reconnect | Attempts to refresh the connection to the server. Useful if your client is stuttering or misbehaving in any way. |
| Quit | Disconnects from the server and closes the |
| Menu Tab Option | Description of Option |
|---|---|
| Open Character Preferences | Opens the Character Preferences Panel |
| Open Game Preferences | Opens the Game Preferences Panel |
| Menu Tab Option | Description of Option |
|---|---|
| Admin Help | Opens up an Admin Help, can also be accessed with the F1 hotkey. |
| Hotkeys | Takes you to the Hotkeys Help window, which builds from your customized hotkeys. |

Command Line
Here you can enter verbs manually, with autofill support. Useful if you know what you're doing.
| Menu Tab Option | Description of Option |
|---|---|
| Quick screenshot | Take a quick screenshot with F2, which is stored in your C:\Users\(User)\Documents\BYOND\screenshots folder. |
| Save screenshot as | Similar to above, but you get a popup to choose where. |
| Reconnect | Attempts to refresh the connection to the server. Useful if your client is stuttering or misbehaving in any way. |
| Quit | Disconnects from the server and closes the |
| Menu Tab Option | Description of Option |
|---|---|
| Open Character Preferences | Opens the Character Preferences Panel |
| Open Game Preferences | Opens the Game Preferences Panel |
| Menu Tab Option | Description of Option |
|---|---|
| Admin Help | Opens up an Admin Help, can also be accessed with the F1 hotkey. |
| Hotkeys | Takes you to the Hotkeys Help window, which builds from your customized hotkeys. |
Configuring Your Client
Now that we can get around, it's time to make the client YOURS.
Getting familiar with what can be tuned and controlled will improve your gameplay experience down the road.
Game Preferences
Under the Top Bar > Preferences > Game Preferences option we can begin setting things up for gameplay.
This is not required, but it is encouraged for player Quality of Life.
Settings
This area controls the primary behavior of the client, and enables or disables features.
| Menu Tab Option | Description of Option |
|---|---|
| Quick screenshot | Take a quick screenshot with F2, which is stored in your C:\Users\(User)\Documents\BYOND\screenshots folder. |
| Save screenshot as | Similar to above, but you get a popup to choose where. |
| Reconnect | Attempts to refresh the connection to the server. Useful if your client is stuttering or misbehaving in any way. |
| Quit | Disconnects from the server and closes the |
| Menu Tab Option | Description of Option |
|---|---|
| Open Character Preferences | Opens the Character Preferences Panel |
| Open Game Preferences | Opens the Game Preferences Panel |
| Menu Tab Option | Description of Option |
|---|---|
| Admin Help | Opens up an Admin Help, can also be accessed with the F1 hotkey. |
| Hotkeys | Takes you to the Hotkeys Help window, which builds from your customized hotkeys. |
Keybindings
This is where you can change how hotkeys work. There is a ridiculous level of control here.
There is a row of navigational buttons to take you to each major section of the page quickly
| Menu Tab Option | Description of Option |
|---|---|
| Quick screenshot | Take a quick screenshot with F2, which is stored in your C:\Users\(User)\Documents\BYOND\screenshots folder. |
| Save screenshot as | Similar to above, but you get a popup to choose where. |
| Reconnect | Attempts to refresh the connection to the server. Useful if your client is stuttering or misbehaving in any way. |
| Quit | Disconnects from the server and closes the |
| Menu Tab Option | Description of Option |
|---|---|
| Open Character Preferences | Opens the Character Preferences Panel |
| Open Game Preferences | Opens the Game Preferences Panel |
| Menu Tab Option | Description of Option |
|---|---|
| Admin Help | Opens up an Admin Help, can also be accessed with the F1 hotkey. |
| Hotkeys | Takes you to the Hotkeys Help window, which builds from your customized hotkeys. |
Creating Your Character
Special names are names specific to certain roles - for example, if you're the clown, you may want a funny name instead of your regular one. The name policy is relaxed on these, so if you have a funny idea for a name, go nuts (within reason - this is at admin discretion). The only custom job preference is specific to security officers, and allows you to choose the department you'd like to monitor. The Uplink spawn location is specific to the traitor role, and determines the item you can access your uplink from, where you can purchase different tools to accomplish your goals. The various species options have some effects on gameplay - you can browse the articles for lizards, flypeople, and plasmamen for more info.
Next, press the Set Occupation Preferences button.
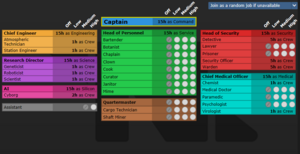
If the button next to Assistant is a red NO, click it once so that it says YES in green text. This sets your job to be assistant, no matter what.
When the game begins, the server checks each players occupation preferences, and assigns jobs accordingly. You can pick High, Medium, Low, or Never. Each player is limited to one High preference job. Some roles have limited player counts - for example, there is only one Captain. There is no limit on assistants, and it's a role that has no responsibilities, so it's ideal for getting to grips with the game. Some jobs that are critical to game progression are locked off until a certain amount of time has passed since your first login. Check the job selection and assignment page for more info.
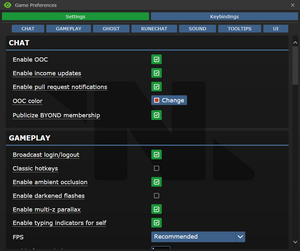
After that, press Done, then, Save Setup. Then click on Game Preferences at the top of the character creation screen. The menu will change and have a big list of options.
Make sure all of the Special Role Settings are set to No (These control optional settings, like choosing if you'd like to roll for a traitor role - they assume you know how to play the game and are important to the round, so we want them off for now.) More importantly, change the Keybindings option to "Hotkeys". This guide will assume you're using this control scheme, as it provides quicker functions for actions than the default controls. Most of the options here are relatively self explanatory or irrelevant, so once you're done, click Save Setup one last time and close the window. Template:Clear
Joining the Game
Now that you've created your character, you're ready to join the game. (You may want to continue to read the guide before jumping in.)
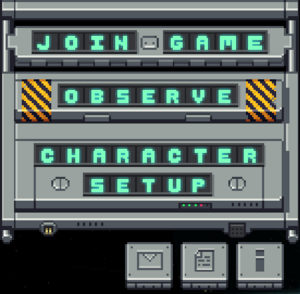
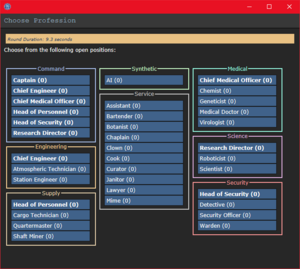
There's two possible menus here - the lobby screen will either display a list that has Join Game! or a Ready/Not Ready toggle.
</tab>
If the window has three buttons that say Ready, Not Ready, and Observe, that means a round has not started yet.
This is ideal, because you'll be playing the round from the beginning, when things are the going to be calm and allow you to get your bearings in a relatively safe environment. Toggle the button to Ready, then wait for the game to begin. (You can see the time until the game begins on the Lobby tab, on the top right of the game window.)
Pressing Observe will spawn you as a ghost, which is essentially a spectator - you won't be able to spawn normally until the next round if you select this option!
Interface 101
Tabs

Before you do anything else, take a look at the top right of the game window. You'll see some tabs labelled Status, Lobby, Admin, IC, OOC, Object, and Preferences. The most important tabs are the Status and Admin tabs. If you're using internals (an oxygen tank and mask), the Status tab tells you the remaining air pressure - useful for avoiding death by suffocation. The Admin tab contains the Adminhelp button, used to contact admins directly if you have a question or believe someone is breaking the rules.
- Status
- Displays important info such as your ping, the current map, pressure remaining in airtanks, etc.
- Admin
- Contains buttons that allow you if any admins are online, and most importantly, to send a message directly to the admins (the Adminhelp button). If no admins are online, the message will be forwarded to the admin IRC channel.
- IC
- Stands for "In Character". Usually won't use this. (The Pray button allows you to send a message to any admins online in character - often used for "communicating with the gods". Another useful button is Rest, which lets you go prone at will.)
- OOC
- Stands for "Out of Character". Again, rarely needs to be used. Various functions that are related to the game, but not something your character does (eg. seeing the number of players online).
- Object
- Never used. Contains buttons to manipulate objects (eg. drag/stop dragging an object), but there are hotkeys to do these things much faster.
- Preferences
- Self explanatory - contains various options you can toggle on and off.
In the Status tab, take note of the map currently being played on the server. It'll be used later in the guide.
HUD
The biggest barrier to entry in Space Station 13 is the controls. The UI is, at a glance, complex, and the controls are unintuitive. Thankfully, once it clicks, you'll never have an issue with it again. Don't let it overwhelm you - after a round or two of practice, you should be fine.
The top right of the screen contains the action tabs mentioned previously, and the bottom right is the text log. This is where you can see what people are saying, what's happening around you, and chat such as OOC or adminhelps. The bar along the bottom of the screen is the input bar, but since we're on Hotkey mode we won't need to use it. There's quite a few HUD elements on the main screen, so let's break them down into sections. Don't worry if you can't memorize what everything does at once - you can always come back to this guide.
Hands
![]() One of the most important elements of the HUD. You have the ability to hold an item in each hand (unless an item takes up both hands, obviously). The square around one of the hands is the selected hand. If you have an empty selected hand, and click on an object, you'll pick it up/open it/use it. If an object is in your selected hand and you click on something, you'll use it on the item you're holding. (The way this works means that if you'd like to unequip your backpack, you need to click and drag the bag into your hand - if it was removed by clicking on it, you'd never be able to open the bag.)
One of the most important elements of the HUD. You have the ability to hold an item in each hand (unless an item takes up both hands, obviously). The square around one of the hands is the selected hand. If you have an empty selected hand, and click on an object, you'll pick it up/open it/use it. If an object is in your selected hand and you click on something, you'll use it on the item you're holding. (The way this works means that if you'd like to unequip your backpack, you need to click and drag the bag into your hand - if it was removed by clicking on it, you'd never be able to open the bag.)
If this seems confusing, don't worry - it'll be explained shortly.
Inventory
The backpack ![]() icon can be toggled to show your worn equipment.
icon can be toggled to show your worn equipment.
The belt ![]() , backpack
, backpack ![]() , and pocket
, and pocket ![]() icons are all storage locations.
icons are all storage locations.
The ID ![]() slot can hold your ID, or your PDA (which can hold your ID).
slot can hold your ID, or your PDA (which can hold your ID).
Interactions
These buttons directly affect how you interact with objects.
The drop ![]() and throw
and throw ![]() icons do what the name implies. Dropping is self explanatory, but the throw button is a toggle - if it's on and you click somewhere, you'll throw the item in your hand at where you clicked. (You can also press R to enable throwing and Q to drop your held item.)
icons do what the name implies. Dropping is self explanatory, but the throw button is a toggle - if it's on and you click somewhere, you'll throw the item in your hand at where you clicked. (You can also press R to enable throwing and Q to drop your held item.)
The pull ![]() icon only appears when dragging something, and can be pressed to stop dragging an object. Hotkey: "H".
icon only appears when dragging something, and can be pressed to stop dragging an object. Hotkey: "H".
The internals ![]() icon can be clicked to enable/disable your internals (oxygen tank and breath mask).
icon can be clicked to enable/disable your internals (oxygen tank and breath mask).
The resist ![]() icon can be pressed to break out of grabs, restraints, and if you're on fire, is the "stop drop and roll" button. Hotkey: "B".
icon can be pressed to break out of grabs, restraints, and if you're on fire, is the "stop drop and roll" button. Hotkey: "B".
The run/walk toggle ![]() icon can be pressed to switch between running and walking. Running is faster, but walking has benefits, such as being able to walk over water without slipping - useful for when the janitor doesn't put wet floor signs down. Hotkey: Hold "alt" to walk.
icon can be pressed to switch between running and walking. Running is faster, but walking has benefits, such as being able to walk over water without slipping - useful for when the janitor doesn't put wet floor signs down. Hotkey: Hold "alt" to walk.
The body selector ![]() icon is used to choose which body part you want to target. This is used for both targeting specific sections to heal, or targeting specific sections when attacking someone. Click a limb to target it. (You can target individual arms, legs, the head, the upper torso, the groin, the eyes, or the mouth.) Hotkeys: "numpad keys".
icon is used to choose which body part you want to target. This is used for both targeting specific sections to heal, or targeting specific sections when attacking someone. Click a limb to target it. (You can target individual arms, legs, the head, the upper torso, the groin, the eyes, or the mouth.) Hotkeys: "numpad keys".
Combat Indicator File:Combat.png this indicator turns on 'combat mode', which displays an icon above your sprite indicating you are prepared for combat. Doing this is required before you engage in any fighting, both mechanically and rules wise, as it raises your defense against people that aren't in it substantially, as well as massively boosting your weapon accuracy and melee damage for all sources. Hotkeys: "C".
Last but not least is the intent selector ![]() - this will be explained in detail later. It has four modes: Help, Disarm, Grab, and Harm, in clockwise order. Hotkeys: "1-4".
- this will be explained in detail later. It has four modes: Help, Disarm, Grab, and Harm, in clockwise order. Hotkeys: "1-4".
Health
The health ![]() icon and
icon and ![]() doll change depending on how injured you are.
doll change depending on how injured you are.
Misc Icons
The crafting menu ![]() icon opens the crafting menu.
icon opens the crafting menu.
The speech bubble ![]() icon opens the languages menu. You won't need to use this for the tutorial.
icon opens the languages menu. You won't need to use this for the tutorial.
The create area ![]() icon is used to create an "area", which is a more advanced topic. You won't need to worry about it for this tutorial.
icon is used to create an "area", which is a more advanced topic. You won't need to worry about it for this tutorial.
Alerts
![]() Oxygen warning - The air you're breathing doesn't have enough oxygen.
Oxygen warning - The air you're breathing doesn't have enough oxygen.
![]() Pressure warning - Pressure levels are too high (red) or too low (black). Low and high pressures can kill you.
Pressure warning - Pressure levels are too high (red) or too low (black). Low and high pressures can kill you.
![]() Toxin warning - You are breathing in toxic gases.
Toxin warning - You are breathing in toxic gases.
![]() Fire warning - The air is hot enough to burn you.
Fire warning - The air is hot enough to burn you.
![]() Freeze warning - The air is cold enough to freeze you.
Freeze warning - The air is cold enough to freeze you.
![]() Temperature warning - You're too cold or too hot.
Temperature warning - You're too cold or too hot.
![]() Hunger warning - You're starting to get hungry. You cannot die from hunger, but the longer you go without food, the slower you will be able to run. You can also eat too much and become bloated.
Hunger warning - You're starting to get hungry. You cannot die from hunger, but the longer you go without food, the slower you will be able to run. You can also eat too much and become bloated.
Gameplay Concepts
Before getting into anything else, it's important to note that since SS13 is such an open ended game that has other people in it, when you get in game and try to follow the guide, things may go wrong - the station might have been almost entirely consumed by a singularity, a traitor could attack you with a powerful weapon, or something no one could have predicted will kill you. It's important to not let death get to you - Rule 10 exists for a reason! There are multiple ways you can be brought back into the game - don't get frustrated if something happens.
As a brand-new player, your first objective is simply joining the station as non-essential crew and attempting to survive, escaping via the evacuation shuttle or one of the pods located around the station. From there, you can branch out into more of the specific concepts that are often stumbling blocks for newer players, so let's address those first. (These are all in expandable boxes to save space, but it's not a bad idea to read them beforehand.)
The Hands System
One of the things the majority of new players have trouble with is the hands system. It's not complex once you've figured it out, but it can be difficult to understand without help. You must use them interchangeably! You can activate items in one hand with the other, combine them, as well you can place items down to interact in the same way with them as they sit nearby. Players will be able to see what is in your hands.
You have two hands at your disposal. The bright box around one of your hands is the selected hand. This is the hand that's used whenever you click on something - if it's empty, you'll either pick up an item, or interact with something (like a computer terminal or vending machine).
If you have something in your selected hand, you'll use that item on whatever you click on. This can lead to confusion, because if you have something in your hand, you can't use things such as terminals or vending machines - you'll either hit the object with your item or do nothing.
This is because you're trying to directly use the item on the object - this is why you're able to use a screwdriver to open the panel on a door, use wirecutters on a grille, or similar actions.
This can also cause problems with backpacks, boxes, and other containers - if you want to open a container, alt click it. You can also pick it up, then switch hands and click on the container with an empty hand. Clicking on a container with an object will put it in the container. This also means that if you'd like to take your backpack off, you need to click and drag the bag to an empty hand - a normal click just opens the equipped bag.
1. Combat Indicator
Damage
There are a few different damage types in SS13. If you take enough damage, you'll fall unconscious into critical condition, better known as Crit. If left untreated in this state, you'll slowly suffocate until you die.
Brute damage is received from physical attacks - punches, kicks, toolboxes, hatchets - if someone is hitting you over the head with it, it does Brute damage.
Burn damage is received from fire or exposure to the vacuum of space.
Toxin damage is received from breathing in poison gases, attacks from enemies like giant spiders, ingesting poison, drinking too much booze, or generally having any harmful chemical in your blood.
Oxygen damage is received from being unable to breathe, or while in critical condition. It goes down over time by itself if you're not in crit.
Brain damage is reveived from being cloned or other things. Can randomly cause brain traumas. Those suffering from brain damage usually need chemicals to cure their condition.
Cellular damage is reveived from being cloned or from being fed on by a slime. Can be cured with cryo treatment.
Brute and Burn damage are applied to specific limbs. If you've been smacked in the head with a toolbox a few times, you'll have to aim at your head (with numpad keys) when you use a bruise pack. Most medicines can be ingested to heal damage anywhere on your body. If you take enough damage to one limb, you can be dismembered. You will need surgery to replace lost limbs.
Combat
Combat in SS13 is very heavily focused on who falls over first. If you're prone, you've likely lost. This means items like soap ![]() or disablers
or disablers ![]() are extremely useful.
are extremely useful.
If you get into a fight, consider your options - it may be best to try and simply run away. If you think you can disarm your opponent, you could turn the tables by taking their weapon. Combat in SS13 is fast paced and revolves around a lot of back and forth swipes, almost like a strange joust between 2D spacemen.
Getting better at combat in SS13 requires practice - there's only so much you can be taught. The rest is learning how to create and take advantage of opportunities. Hopefully, you won't have to get into many fights as you start out.
Being in combat mode is paramount to winning any engagement, as without it on you'll be taking substantially more damage, and dealing incredibly less. Being caught off-guard by someone with the indicator on puts you at a huge disadvantage.
To learn more about combat and how to win fights, see the Guide to Combat.
Ghosts
If you end up dying, don't worry, there's a few ways to go from there.
If you try to move, you'll ghost out of your corpse. This is essentially spectator mode - you can communicate with other dead players (and talking about the round out of character is okay in this chat) by talking normally and are able to fly around the entire map. (Note that while it's okay to talk about the round in deadchat, if you're revived, you cannot use any information gained while dead. Anything you saw while alive is fair game.)
If you die, you can be cloned, revived via defibrillator, turned into a podperson, have your brain removed and put into a cyborg, or more. There are ghost roles that can be played by dead players - some areas have objects that, when clicked on as a ghost, will spawn you as a new character. (You're a new character, so don't use any information from your past life.) There may even be alerts that pop up while you're dead, asking if you'd like to take control of a xenomorph, a morph, or almost anything else. These are often provided by admins, but can occasionally happen via random event. Please note that if you take on a ghost role you CANNOT be cloned or return to your original body!
Playing the Game
 |
C-05-MO, the AI says: "Hello! The automatic diagnostic and announcement system welcomes you to Space Station 13. Remember: Have a secure day." |
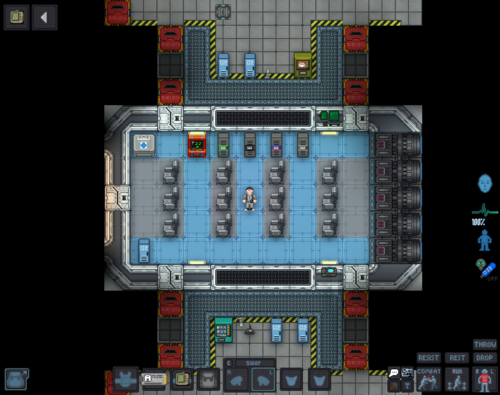
Now that we've gone over the interface and some more important game concepts, let's jump into the game. If you join a game in progress, you'll spawn on the Interlink..
What to do if There's a Breach
If you hear the telltale sound of air being sucked out of a room or see a hole in the station, something's gone wrong and caused a breach. It's wise to avoid being exposed to the vacuum of space for too long, but if you need to pass by, you can put internals on.
When you spawn, inside your backpack is an emergency kit with a small tank of O2, a breath mask, and an epipen to stabilize someone who's in crit.
- Step 1
- Using an empty hand, click on your backpack, then click + drag the box inside to your character's sprite. This will open the box.
- Step 2
- Take the breath mask and put it on your mask
 slot (press the equipment
  icon to see it).
 - Step 3
- Take the O2 tank and put it in one of your pockets. This leaves your hands free for other tasks.
- Step 4
- Press the internals
 icon to turn on your air supply.
This will keep you breathing clean air - make sure to avoid exposure to a vacuum for too long, and watch your air tank's supply in the Status bar!
|
File:Nuvola apps important.svg2. Hazards:
|
